Pythonとopencv4で特徴量パターンマッチングしてから対象部分を抽出する
前回のプログラム、AKAZE検出器を使った特徴量パターンマッチングの改良版。
greenhornprofessional.hatenablog.com
比べる2つの画像の角度、大きさが違っても大丈夫。ちゃんと該当する部分を抽出する、というもの。ただし、画像の画素数が少ないと検出率が悪くなるので注意。
処理の流れは、
- 2つの画像から特徴量(正しくはその座標値)を抽出し、画像の回転ズレを揃える。
- 回転補正した画像をつかって、再び、特徴量(正しくはその座標値)を抽出し、縦横の縮尺を計算する。
- バウンディングボックスを描画する。
次回はこの発展で、抽出した画像との差分検出を実装する、予定。
結果
縦横比が違うのでわかりづらいけど、ちゃんと同じ領域をバウンディングボックスで囲えている。
1番目:オリジナルのサンプル画像
2番目:基準画像との回転ズレを補正したサンプル画像
3番目:回転補正により生じたデータなし部分をカットしたサンプル画像
4番目:基準画像に3番目の画像とマッチする部分をバウンディングボックスで囲ったもの


プログラム
# 25_PatternMatch_001.py
# python 3.8.1
# opencv-contrib-python 4.2.0.32
# opencv-python         4.1.2.30
# coding: utf-8
#
import cv2
import numpy as np
import math
import sys

#==============#
# Make img src #
#==============#
# Here, "Train" meanig standard or criterion, "Query" meaning sample to be tested.
## Read images.
img_query = cv2.imread("25_query.jpg")
img_train = cv2.imread("25_train.jpg")

cv2.imshow("Query_original", img_query)

## Convert color image to gray image.
grayImg_query = cv2.cvtColor(img_query, cv2.COLOR_BGR2GRAY)
grayImg_train = cv2.cvtColor(img_train, cv2.COLOR_BGR2GRAY)

cv2.imshow("Query_gray scale", grayImg_query)

#======================#
# Make keypoints array #
#======================#
def makeKeypointsArry(query, train):
    ## Make instance of Detector.
    detector = cv2.AKAZE_create()
#    detector = cv2.ORB_create()

    ## Find keypoints and descriptors.
    kp_query, des_query = detector.detectAndCompute(query, None)
    kp_train, des_train = detector.detectAndCompute(train, None)

    ## Make instance of Matcher.
    matcher = cv2.BFMatcher(cv2.NORM_HAMMING, crossCheck=False)
#    matcher = cv2.BFMatcher(cv2.NORM_L2, crossCheck=False)
#    matcher = cv2.BFMatcher(cv2.NORM_L1, crossCheck=False)

    ## Match descriptors.
    matches = matcher.knnMatch(des_query, des_train, k=2)

    ## Appy ratio test.
    ratio = 0.4
    good = []
    for m, n in matches:
        if m.distance < ratio * n.distance:
            good.append(m)

    ## Conncet keypoints with lines.
#    img_result = cv2.drawMatches(img_query, kp_query, img_train, kp_train, good, None, flags=2)
    ## Show connection.
#    cv2.namedWindow("Connection", cv2.WINDOW_NORMAL)
#    cv2.imshow('Connection', img_result)
#    cv2.waitKey(0)
#    cv2.destroyAllWindows()

    ## Extract XY coordinate from DMatch.
    n = len(good)
    if n >= 3:
        kp_query_x = []
        kp_query_y = []
        kp_train_x = []
        kp_train_y = []
        for i in range(n):
            gq = good[i].queryIdx
            gt = good[i].trainIdx
            kp_query_x.append(kp_query[gq].pt[0])
            kp_query_y.append(kp_query[gq].pt[1])
            kp_train_x.append(kp_train[gt].pt[0])
            kp_train_y.append(kp_train[gt].pt[1])

        return kp_query_x, kp_query_y, kp_train_x, kp_train_y

    else:
        print("An error occured. Program will finish.")
        sys.exit()

#=================================#
# Correct rotation of query-image #
#=================================#
def rotationCorrection(query, train):
    ## Make keypoints array.
    query_x, query_y, train_x, train_y = makeKeypointsArry(query, train)

    ## Calculate angle difference between query and train.
    query_deg = math.atan2(max(query_y) - min(query_y), max(query_x) - min(query_x)) * 180 / math.pi
    train_deg = math.atan2(max(train_y) - min(train_y), max(train_x) - min(train_x)) * 180 / math.pi
    angle = query_deg - train_deg

    ## Do affine transformation.
    center = (min(query_x), min(query_y))
    scale = 1.0
    height, width = query.shape
    size = (width, height)

    rotation_matrix = cv2.getRotationMatrix2D(center, angle, scale)
    img_rot = cv2.warpAffine(query, rotation_matrix, size, flags=cv2.INTER_CUBIC)

    cv2.imshow("Query_rotation corrected", img_rot)

    ## Shave off 4 edges of img_rot.
    cut_rate = 0.05
    cut_y = int(height * cut_rate)
    cut_x = int(width  * cut_rate)
    img_crop = img_rot[cut_y : height - cut_y, cut_x : width - cut_x]

    cv2.imshow("Query_cropped", img_crop)

    return img_crop

#=================================#
# Draw boundingbox on train-image #
#=================================#
def extractImage(query, train):
    ## Make keypoints array.
    query_x, query_y, train_x, train_y = makeKeypointsArry(query, train)

    ## Calcularate size difference between query and train.
    x_mag = (max(query_x) - min(query_x)) / (max(train_x) - min(train_x))
    y_mag = (max(query_y) - min(query_y)) / (max(train_y) - min(train_y))

    ## Determine boundingbox position.
    height, width = query.shape
    x1 = int(min(train_x) - min(query_x) / x_mag)
    x2 = int(x1 + width / x_mag)
    y1 = int(min(train_y) - min(query_y) / y_mag)
    y2 = int(y1 + height / y_mag)

    ## Draw boundingbox.
    cv2.rectangle(img_train, (x1, y1), (x2, y2), (0, 255, 0), 2)
    cv2.namedWindow("Result", cv2.WINDOW_NORMAL)
    cv2.imshow("Result", img_train)

#======#
# Main #
#======#
grayImg_query_crop = rotationCorrection(grayImg_query, grayImg_train)
extractImage(grayImg_query_crop, grayImg_train)
参考サイト
こちらを主に参考にした。
細かい計算方法は違うが、アプローチは一緒。
OpenCVを使ったパターンマッチングで画像中の物体抽出 with Python - Qiita
今回、一番助かったサイト。
この記事と出会わなければ積んでいた。
OpenCVで特徴量の座標を取得する - Qiita
"Train" "Query" はどっちがどっちかわからない。
StackOverflowで解説を見つけた。とりあえず、以下のように思っておけばよさそう。
Train → 基準、データベース
Query → サンプル、検査(照会)にかけられる
c++ - What is `query` and `train` in openCV features2D - Stack Overflow
Detector(検出器)とDiscriptor(記述子)の違い
image processing - difference between feature detector and descriptor? - Signal Processing Stack Exchange
Pythonで処理前後の画像を並べてGUIに表示して、パラメータによる画像変化がダイナミックにわかる
画像処理のパラメータを決めるとき、パラメータ変化がすぐに画像に反映されると、だいぶやりやすくなる。
ガウシアンフィルターをかけたときの変化が見えるようにツールを作った。画像処理はopencv、GUIはTkinterを使用した。
結果
左が元画像、右がガウシアンフィルターをかけた画像。右端のスライダーコントロール(Pythonではスケールと呼ぶ)でガウシアンフィルターのパラメータ(フィルターのサイズ、ガウシアンの偏差)が可変できる。すぐ画像に反映される。

プログラム
# 24_image_show_001.py
# python 3.8.1
# opencv-python 4.1.2.30
# Pillow 7.0.0
# tkinter 8.6
# coding: utf-8
#
import tkinter as tk
from tkinter import HORIZONTAL
from PIL import Image, ImageTk
import cv2

#=============#
# Create root #
#=============#
root = tk.Tk()
root.title("Image Show")
root.resizable(width=False, height=False)

#===============#
# Create frames #
#===============#
frmL = tk.Frame(root)
frmC = tk.Frame(root)
frmR = tk.Frame(root)

#==================#
# Define methods 1 #
#==================#
def formatConverter(img):
    img_rgb = cv2.cvtColor(img, cv2.COLOR_BGR2RGB)  # Convert to RGB format.
    img_pil = Image.fromarray(img_rgb)              # Convert to PIL format.
    img_tk  = ImageTk.PhotoImage(img_pil)           # Convert to ImageTk format.
    return img_tk

#==============#
# Make img src #
#==============#
## Read image
img_bgr = cv2.imread("24_lenna.jpg")
## For image processing
img_tk = formatConverter(img_bgr)
## For original image
c_img_tk = formatConverter(img_bgr)

#==================#
# Define methods 2 #
#==================#
def changeVal(event=None):      #Do not forget 'event=None', or an arg error occurs.
    global imgCVT, blur_tk
    size  = 3 ** val1.get()
    sigma = val2.get()
    blur = cv2.GaussianBlur(img_bgr, (size, size), sigma)
    blur_tk = formatConverter(blur)

    imgCVT.configure(image=blur_tk)
    label_val1.configure(text=size)
    label_val2.configure(text=sigma)

#    imgCVT.photo = blur_tk     #If you do not want "blur_tk" to be global val, activate this script instead.
#    imgCVT.image = blur_tk     #This will work as well as above.

#================#
# Create widgets #
#================#
imgORG = tk.Label(frmL, image=c_img_tk)
imgCVT = tk.Label(frmC, image=img_tk)

val1 = tk.IntVar()
scale1 = tk.Scale(
    frmR,
    variable = val1,
    from_ = 0,
    to = 4,
    resolution = 1,
    showvalue = 0,
    label = "Filter:size",
    orient = tk.HORIZONTAL,
    command = changeVal
    )

val2 = tk.IntVar()
scale2 = tk.Scale(
    frmR,
    variable = val2,
    from_ = 1,
    to = 10,
    resolution = 1,
    showvalue = 0,
    label = "Filter:sigma",
    orient = tk.HORIZONTAL,
    command = changeVal
    )

label_imgORG = tk.Label(frmL, text="Original image")
label_imgCVT = tk.Label(frmC, text="Converted image")
label_val1   = tk.Label(frmR, text="1")
label_val2   = tk.Label(frmR, text="1")

#========#
# Layout #
#========#
frmL.pack(side='left')
frmC.pack(side='left')
frmR.pack(side='left')

imgORG.pack(side='top')
label_imgORG.pack(side='top')

imgCVT.pack(side='top')
label_imgCVT.pack(side='top')

scale1.pack(side='top')
label_val1.pack(side='top')
scale2.pack(side='top')
label_val2.pack(side='top')

root.mainloop()
参考サイト
Tkinter に画像を表示させる
Pythonでグラフ(Matplotlib)を表示して動的に変更する — 某エンジニアのお仕事以外のメモ(分冊)
Tkinterで作成したウインドウにOpenCV-Pythonの画像を表示 - Qiita
Labelに表示した画像を更新する方法(これがわかるまで時間かかった)
python - How to update the image of a Tkinter Label widget? - Stack Overflow
The Tkinter Label Widget
The Tkinter PhotoImage Class
Opencvのガウシアンフィルター
opencv-python画像処理入門 - Qiita
Pythonでリストの先頭だけを代入する(疑問あり)
リストの先頭の要素だけを変数に代入する方法として次の方法がある。
Pythonでタプルやリストをアンパック(複数の変数に展開して代入) | note.nkmk.me
#python 3.8.2
_list = [0, 1, 2, 3]

print(_list)
print(type(_list))

a, *b = _list      #先頭要素を a に、それより後を b に代入

print(a)
print(type(a))
print(b)
print(type(b))
---実行結果---
_list = [0, 1, 2, 3]
<class 'list'>
a = 0
<class 'int'>
b = [1, 2, 3]
<class 'list'>
一方で、アスタリスクの記述(上記では*b)を省略している例も見つけた。
Pythonでグラフ(Matplotlib)を表示して動的に変更する — 某エンジニアのお仕事以外のメモ(分冊)
h, = ax.plot([],[], 'green')
ちなみにax.plot([],[], 'green')はリスト型。
_plot = ax.plot([],[], 'green')
print(_plot)
print(type(_plot))
[<matplotlib.lines.Line2D object at 0x08F73BC8>]
<class 'list'>
では、以下も動くのかと思いきや、、エラーがでる。なぜだ…
_list = [0, 1, 2, 3]
a, = _list
print(a)
a, = _list
ValueError: too many values to unpack (expected 1)
Pythonで状態に合わせてボタンの見た目を変える(Tkinter) - Threading 追加 -
前回のGUIにStopボタンを実装した。
カウントアップする関数を別Threadにして、Stopボタンを押すことで停止のフラグを立てる、というもの。
※Print文で要所要所のThreadリストを出しているが、Threadがいつ死んでいるのかが結局わからなかった。
※あと、Thread.join()は使い方がわからない。これがあるとプログラムが異常停止する…
greenhornprofessional.hatenablog.com
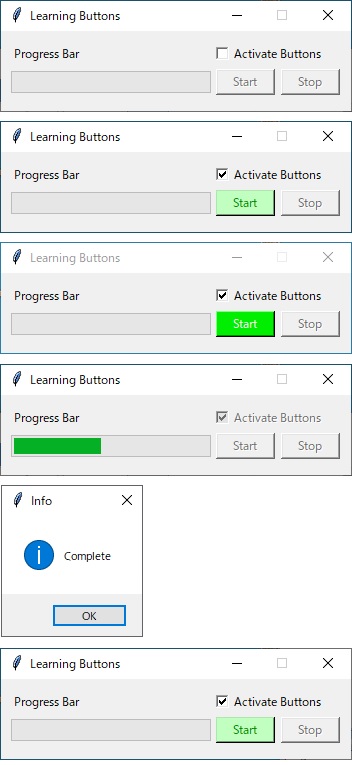
結果
チェックボックスにチェックを入れると、スタートボタンのみが有効になる。マウスオーバーで色が変わる。

スタートボタン押した直後、プログレスが100%になるまでの間、ストップボタンが有効になる。マウスオーバーで色が変わる。

ストップボタンを押すと、プログレスバー(カウントアップ)が停止し、ワーニング画面をだす。
※ワーニング画面を閉じた直後はまだThreadが残っている。

ワーニング画面を消すと、プログレスバーが0%に戻り、スタートボタンが有効になる。
※スタートボタン押すと、Thread = Noneするようになっているが、この前にThreadが消えている。なぜ…

プログラム
# 23_tkinter_button2_001.py
# python 3.8.1
# tkinter 8.6
# coding: utf-8
#
import tkinter as tk
from tkinter import ttk as ttk
from tkinter import messagebox as tkm
from tkinter import HORIZONTAL
from time import sleep
from datetime import datetime
import threading

#プログレスバーの進捗度を保存する変数
prbval = 0
stop_flag = False
t = None

#サイズ350x80で固定のウィンドウ作成
root = tk.Tk()
root.title("Learning Buttons")
root.geometry('350x80')
root.resizable(width=False, height=False)

#スタートボタンの内容
def start_button():
    global stop_flag
    global t
    print(datetime.today(),":Start button clicked:", threading.enumerate())
    t = None
    print(datetime.today(),":Thread killed       :", threading.enumerate())
    t = threading.Thread(target=run)
    stop_flag = False
    t.start()
    sleep(0.1)
    print(datetime.today(), ":Thread started      :", threading.enumerate())

def run():
    global prbval
    global stop_flag
    b1.configure(state=tk.DISABLED, bg='SystemButtonFace')
    b2.configure(state=tk.NORMAL, fg='Green4', bg='DarkSeaGreen1')
    chk1.configure(state=tk.DISABLED)
    try:
        while prbval <= 20:
            if stop_flag == True:
                raise ZeroDivisionError
            sleep(0.2)
            prbval = prbval + 1
            prb.configure(value = prbval)
            prb.update()                    #この1行がないとプログレスが描画されない
    except ZeroDivisionError:
        tkm.showwarning("Warning", "Stop button clicked!")
    except:
        tkm.showerror("Error", "Unexpected error!!")
    else:
        tkm.showinfo("Info", "Complete")

    prbval = 0
    prb.configure(value = prbval)
    b1.configure(state=tk.NORMAL, fg='Green4', bg='DarkSeaGreen1')
    b2.configure(state=tk.DISABLED, bg='SystemButtonFace')
    chk1.configure(state=tk.NORMAL)
    print(datetime.today(), ":run() finished      :", threading.enumerate())

#ストップボタンの内容
def stop_button():
    global stop_flag
    global t
    print(datetime.today(),":Stop button clicked :", threading.enumerate())
    if t:
        stop_flag=True

#スタートボタンにカーソルを重ねたときの挙動
def b1_mouseOver(event):
    if b1['state'] == 'normal':
        b1.configure(fg='Snow', bg='Green2')
    else:
        return

#スタートボタンからカーソルを外したときの挙動
def b1_mouseOut(event):
    if b1['state'] == 'normal':
        b1.configure(fg='Green4', bg='DarkSeaGreen1')
    else:
        return

#ストップボタンにカーソルを重ねたときの挙動
def b2_mouseOver(event):
    if b2['state'] == 'normal':
        b2.configure(fg='Snow', bg='Green2')
    else:
        return

#ストップボタンからカーソルを外したときの挙動
def b2_mouseOut(event):
    if b2['state'] == 'normal':
        b2.configure(fg='Green4', bg='DarkSeaGreen1')
    else:
        return

#チェックボックスの内容
def switch(bln):
    global t
    if bln == True:
        b1.configure(state=tk.NORMAL, fg='Green4', bg='DarkSeaGreen1')
    else:
        b1.configure(state=tk.DISABLED, bg='SystemButtonFace')
        b2.configure(state=tk.DISABLED, bg='SystemButtonFace')
        t = None
        print(datetime.today(), ":Button disabled     :", threading.enumerate())

#チェックボックスの状態を表す変数の定義
bln1 = tk.BooleanVar()
bln1.set(False)

#チェックボックス作成
chk1 = tk.Checkbutton(root, variable=bln1, text="Activate Buttons", command=lambda: switch(bln1.get()))
chk1.place(x=210, y=10)

#プログレスバー用のラベル作成
lb1 = tk.Label(text="Progress Bar")
lb1.place(x=10, y=12)

#プログレスバー作成
prb = ttk.Progressbar(root, orient=HORIZONTAL, length=200, mode='determinate')
prb.configure(maximum=20, value=prbval)
prb.place(x=10, y=40)

#スタートボタン作成、デフォルトがDISABLED
b1 = tk.Button(
    root,
    text = "Start",
    width = 7,
    state = tk.DISABLED,
    disabledforeground = 'Gray45',
    command = start_button
    )
b1.bind('<Enter>', b1_mouseOver)
b1.bind('<Leave>', b1_mouseOut)
b1.place(x=215, y=38)

#ストップボタン作成、デフォルトがDISABLED
b2 = tk.Button(
    root,
    text = "Stop",
    width = 7,
    state = tk.DISABLED,
    disabledforeground = 'Gray45',
    command = stop_button
    )
b2.bind('<Enter>', b2_mouseOver)
b2.bind('<Leave>', b2_mouseOut)
b2.place(x=280, y=38)

root.mainloop()
Pythonで状態に合わせてボタンの見た目を変える(Tkinter)
PythonにもGUIフレームワークがあるということで基本的なところを勉強した。こだわり始めるとキリがなく、Pythonの習得から外れていくので気を付けたい。
結果
チェックボックスでスタートボタンのアクティブ ⇔ グレーアウトをコントロール。処理中はスタートボタンをグレーアウト。実際には処理はWhileでカウントアップしているだけ。ただ、その進捗をプログレスバーで表している。
※ストップボタンは表示しているだけ。スレッドの勉強をしてからストップ機能を実装する予定。
1段目:チェックボックスがFalseでボタンはグレーアウト。
2段目:チェックボックスがTrueでボタンがアクティブ。アクティブのときの背景色と文字色を表示。
3段目:ボタンにカーソルを重ねたとき、背景色と文字色を変更。
4段目:処理中。チェックボックスとボタンはグレーアウト。
5段目:プログレスが100%になったら、メッセージボックスを表示する。
6段目:メッセージボックスを閉じると、プログレスがクリアされる。

プログラム
# 22_tkinter_button_001.py
# python 3.8.1
# tkinter 8.6
# coding: utf-8
#
import tkinter as tk
from tkinter import ttk as ttk
from tkinter import messagebox as tkm
from tkinter import HORIZONTAL
from time import sleep

#プログレスバーの進捗度を保存する変数
prbval = 0

#サイズ350x80で固定のウィンドウ作成
root = tk.Tk()
root.title("Learning Buttons")
root.geometry('350x80')
root.resizable(width=False, height=False)

#スタートボタンの内容
def button_click():
    global prbval
    b1.configure(state=tk.DISABLED, bg='SystemButtonFace')
    chk1.configure(state=tk.DISABLED)

    try:
#       raise ZeroDivisionError
        while prbval <= 20:
            sleep(0.1)
            prbval = prbval + 1
            prb.configure(value = prbval)
            prb.update()                    #この1行がないとプログレスが描画されない
        tkm.showinfo("Info", "Complete")
    except:
        tkm.showerror("Error", "Unexpected error!!")
        pass

    prbval = 0
    prb.configure(value = prbval)
    b1.configure(state=tk.NORMAL, fg='Green4', bg='DarkSeaGreen1')
    chk1.configure(state=tk.NORMAL)

#スタートボタンにカーソルを重ねたときの挙動
def mouseOver(event):
    if b1['state'] == 'normal':
        b1.configure(fg='Snow', bg='Green2')
    else:
        return

#スタートボタンからカーソルを外したときの挙動
def mouseOut(event):
    if b1['state'] == 'normal':
        b1.configure(fg='Green4', bg='DarkSeaGreen1')
    else:
        return

#チェックボックスの内容
def switch(bln):
    if bln == True:
        b1.configure(state=tk.NORMAL, fg='Green4', bg='DarkSeaGreen1')
    else:
        b1.configure(state=tk.DISABLED, bg='SystemButtonFace')

#チェックボックスの状態を表す変数の定義
bln1 = tk.BooleanVar()
bln1.set(False)

#チェックボックス作成
chk1 = tk.Checkbutton(root, variable=bln1, text="Activate Buttons", command=lambda: switch(bln1.get()))
chk1.place(x=210, y=10)

#プログレスバー用のラベル作成
lb1 = tk.Label(text="Progress Bar")
lb1.place(x=10, y=12)

#プログレスバー作成
prb = ttk.Progressbar(root, orient=HORIZONTAL, length=200, mode='determinate')
prb.configure(maximum=20, value=prbval)
prb.place(x=10, y=40)

#スタートボタン作成、デフォルトがDISABLED
b1 = tk.Button(
    root,
    text = "Start",
    width = 7,
    state = tk.DISABLED,
    disabledforeground = 'Gray45',
    command = button_click
    )
b1.bind('<Enter>', mouseOver)
b1.bind('<Leave>', mouseOut)
b1.place(x=215, y=38)

#ストップボタン作成
b2 = tk.Button(
    root,
    text = "Stop",
    width = 7,
    state = tk.DISABLED
    )
b2.place(x=280, y=38)

root.mainloop()
参考サイト
tkinterのさわり
Tkinter 使ってみよう - Python 入門
Tkinterを使ってファイル選択GUIを構築しよう | DS Hack
tkinter カラーチャート
File:TkInterColorCharts.png - dftwiki
Bottonのオプション一覧
【Tkinter】ボタン(Button)の使い方
BottonのBindとイベントシーケンス
Tkinter の bind とイベントシーケンス
ButtonのEnable/Disable
python - Disable / Enable Button in TKinter - Stack Overflow
【tkinter】ウィジェットを無効化する方法【Python】 - 初心者でもPythonを使ってみよう
CheckBoxのイベント連携
Python チェックボタンを動的に作成しボタンイベントと連携する(Checkbutton) | 鎖プログラム
Progressbarについて
【Python GUIサンプル】TkinterでProgressbar(プログレスバー)を使ってみる | エンジニアになりたいブログ
python - Setting `orient` keyword argument for Tkinter Scale widget results in NameError: name 'HORIZONTAL' is not defined - Stack Overflow
tkinter.ttk Progressbarの使い方 Python - 初心者でもPythonを使ってみよう
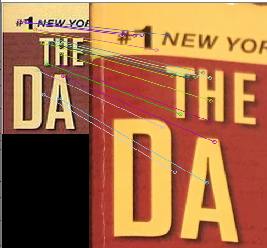
Pythonとopencv4で特徴量パターンマッチング(AKAZE)
いよいよパターンマッチングに着手。
まさにやりたいことを紹介してくれているサイトはあるが、やはりそのままでは動かない。OpenCV2 → 3 → 4 になるにつれて抜けてる機能があるのが原因かと。
cv2.drawMatchesKnn()は使えないので注意!
準備
Pyhton-contribをインストールする。pipで以下のコマンドを実行。
pip install opencv-contrib-python
プログラム
# 21_BFMatcher_001.py
# python 3.8.1
# opencv-contrib-python 4.2.0.32
# opencv-python         4.1.2.30
# coding: utf-8
#
import cv2
import numpy as np

#参照画像(img_ref)と比較画像(img_comp)の読み込み
img_comp = cv2.imread("21_comp.jpg")
img_ref  = cv2.imread("21_ref.jpg")

#グレースケース変換
gray_img_comp = cv2.cvtColor(img_comp, cv2.COLOR_BGR2GRAY)
gray_img_ref  = cv2.cvtColor(img_ref, cv2.COLOR_BGR2GRAY)

#AKAZEの中で輪郭をぼかすフィルターが入っているので、前処理はしない
#gray_img_comp = cv2.blur(img_comp, (3, 3))
#gray_img_ref  = cv2.blur(img_ref, (3, 3))

#AKAZE検出器の生成
akaze = cv2.AKAZE_create()

#特徴量の計算
kp1, des1 = akaze.detectAndCompute(gray_img_comp, None)
kp2, des2 = akaze.detectAndCompute(gray_img_ref, None)

#Brute-Force Matcher生成
bf = cv2.BFMatcher(cv2.NORM_HAMMING, crossCheck=False)
#bf = cv2.BFMatcher(cv2.NORM_L1, crossCheck=False)
#bf = cv2.BFMatcher(cv2.NORM_L2, crossCheck=False)

#特徴量ベクトル同士をBrute-Force&knnでマッチング
matches = bf.knnMatch(des1, des2, k=2)
#matches = sorted(matches, key = lambda x:x.distance)

# データを間引きする
ratio = 0.5
good = []
for m, n in matches:
    if m.distance < ratio * n.distance:
        good.append(m)

#対応する特徴点同士を描画
img_result = cv2.drawMatches(img_comp, kp1, img_ref, kp2, good, None, flags=2)

#画像表示
cv2.namedWindow("Result", cv2.WINDOW_NORMAL)
cv2.imshow('Result', img_result)
cv2.waitKey(0)
cv2.destroyAllWindows()
Pythonで2枚の画像の(単純な)差分をバウンディングボックスで囲う
2つの画像を比較して、差異を部分を枠で囲うプログラム。まずは単純に2つの画像の引き算を行うだけの簡単な処理から。
画像はおなじみのLean。比較画像は、参照画像にペイントでお絵描きしたもの。なので、横ずれや回転が生じていない想定。
結果
2か所誤検出があったが、ほぼ狙い通り検出できた。
上段左:参照画像(元の画像) 右:比較画像(元の画像にお絵描きしたもの)
中段左:差分画像 右:差分画像の2値化
下段:参照画像にバウンディングボックスを描画したもの

プログラム
# 20_SimpleImageComp_001.py
# python 3.8.1
# opencv-python 4.1.2.30
# coding: utf-8
#
import cv2
import numpy as np
from matplotlib import pylab as plt

#参照画像(img_ref)と比較画像(img_comp)の読み込み
img_ref  = cv2.imread('20_ref.jpg', 1)
img_comp = cv2.imread('20_comp.jpg', 1)
temp = img_comp.copy()

#グレースケース変換
gray_img_ref  = cv2.cvtColor(img_ref, cv2.COLOR_BGR2GRAY)
gray_img_comp = cv2.cvtColor(img_comp, cv2.COLOR_BGR2GRAY)

#参照画像の平滑化 ※変化をつけるためにわざと加えている
gray_img_ref  = cv2.blur(gray_img_ref, (3, 3))

#単純に画像の引き算
img_diff = cv2.absdiff(gray_img_ref, gray_img_comp)

#差分画像の2値化(閾値が50)
ret, img_bin = cv2.threshold(img_diff, 50, 255, 0)

#2値画像に存在する輪郭の座標値を得る
contours, hierarchy = cv2.findContours(img_bin, cv2.RETR_TREE, cv2.CHAIN_APPROX_SIMPLE)

#contoursから一個ずつ輪郭を取り出し、輪郭の位置(x,y)とサイズ(width, height)を得る
#サイズが 5x5 以上の輪郭を枠で囲う。
for contour in contours:
    x, y, width, height = cv2.boundingRect(contour)
    if width > 5 or height > 5:
        cv2.rectangle(temp, (x-2, y-2), (x+width+2, y+height+2), (0, 255, 0), 1)
    else:
        continue

#画像表示
cv2.imshow("Original images", np.hstack([img_ref, img_comp]))
cv2.imshow("Processed images", np.hstack([img_diff, img_bin]))
cv2.imshow("Result", temp)
cv2.waitKey(0)
cv2.destroyAllWindows()

